
Backup creation forms an essential and critical aspect while leveraging the benefits of QuickBooks Desktop. As a regular user of QuickBooks Desktop, you should make it a habit of frequently backing up your important QuickBooks Company files. It is a pertinent aspect since it secures the critical accounting data from permanent damage or disruption.
In this context, users should backup transaction reports, bill payments, and necessary documentation related to payrolls. Any breach or loss of data would be detrimental to the organization. This article contains all the relevant information you require to backup QuickBooks desktop Company files. Thus, keep reading ahead!
Walkthrough to Backup QuickBooks Files
Implement the walkthrough below to create a successful backup of your essential QuickBooks Company files. Make sure that you follow all the steps carefully and in sequential order, without skipping any step.
- Open the QuickBooks company file you would like to backup.
- Select the Save copy or Backup option from the File menu.
- Select Backup copy from the drop-down menu and click the next button.
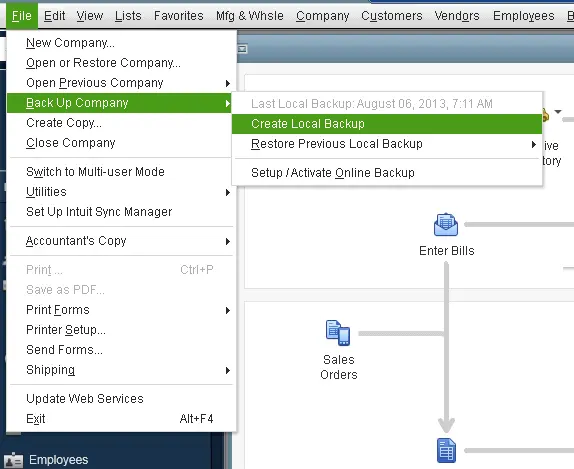
- Now select Local backup and click the next button once more.
- To save the backup file, click on the Navigate option to browse through the selected place.
- Depending on your preference, you can either choose a different location or keep the original file location.
- Click the next button after saving the file.
- The backup procedure has started. Depending on the size of the corporate files, this could take some time.
- A confirmation message appears when completed, along with the new place where the QuickBooks file has been backed up.
Procedure to Restore a Backup File
Once you are done backing up your Company file(s), now is the time to restore the file. To restore the backup file, follow the directions given below:
- On the destination computer, go to the File menu and choose Open or Restore Company.
- Select Restore a backup copy from the drop-down menu.
- Select Local backup from the Next menu.
- Then click Next one again. To view the contents of your backup file, click the down arrow next to the Look in the area and select the location of your backup file.
- Browse until you find the file (which should end in.qbb), then click on it to highlight it. Select Open.
- QuickBooks prompts you to select a location to restore your file.
- In the Save Company File as window, click Next to find it. The Save in the field should point to your primary QuickBooks directory and the File name field should display the correct file name.
- Click Save when everything appears to be in order.
- QuickBooks will open your .qbb file and convert it to the usual QuickBooks file type, .qbw.
Summing Up!
This article entailed the necessary steps for backing your data and restoring your backed files. We are hopeful that the contents of this article proved viable to you. In case you faced any difficulty while implementing the steps mentioned in this article, just give us a call at the QuickBooks desktop support helpline i.e., 1-800-761-1787.


